If you own a DD-WRT router, you can install your VPN's software directly onto it. Remember, not all VPNs are compatible with DD-WRT firmware so you will need to check with your manufacturer if you intend to flash a router with DD-WRT yourself.
For most people, the process of installing DD-WRT firmware is too technical (and can result in "bricking" it). For this reason, the majority of people elect to purchase a ready-flashed DD-WRT router. In fact, it is even possible to buy a pre-flashed DD-WRT router that comes pre-loaded with your VPN's software. For more information about our favorite pre-flashed routers take a look at our 5 best DD-WRT Routers of 2018 page.
If you already own a DD-WRT router and want to install VPN software onto the device yourself - this guide is for you!
Setup a VPN on Your Router
The best form of VPN encryption is OpenVPN. For this reason, this setup guide focuses on that recommended protocol. We recommend that you stick to using OpenVPN if you want your devices to be most secure.
In order to install a top-of-the-range VPN client onto a DD-WRT router (such as ExpressVPN - the one used as an example in this guide), you will require DD-WRT firmware that can run the latest VPN configurations and that has a minimum of 8 MB of flash memory on board.
To check whether your router has these features you will need to check with your manufacturer. Alternatively, you could ask Flashrouters.com - because they are experts on the subject of flashed routers.
If your router is suitable then you can follow the steps in this guide to install the VPN onto your router. In this article, we will guide you through installing an OpenVPN connection on your router (the most secure form of VPN connection with military-grade encryption).
- To set up a VPN on your DD-WRT router, you will first need to download the OpenVPN configuration files. These files will be provided by your VPN, so please contact them for the files. Remember that your VPN will have a setup guide like this one (that is specific to that VPN), so please ask them to see that guide also!
- In your web browser, go to your router’s settings page (on most DD-WRT routers the default address is http://192.168.1.1)
- Once in control panel for your DD-WRT router, click on the Services tab, followed by the VPN sub-tab.
- Next, enable the Start OpenVPN Client option. This will open the OpenVPN configuration panel where you will be able to enter your settings.


For versions of DD-WRT with User Pass Authentication
This step depends on whether your version of DD-WRT firmware has User Pass Authentication. If it does follow these steps, if not jump on to the next section.
- If your version of DD-WRT has User Pass Authentication, your screen should like this:

- If it does, then enter the following settings: strong>Server IP/Name: You will get this address form your VPN Username: You will get this username from your VPN (it might differ from your VPN login username) Password: You will get this password from your VPN (it might differ from your VPN login password)

For versions of DD-WRT without User Pass Authentication
If your version of DD-WRT does not have User Pass Authentication, follow these steps instead:
- Look for the Additional Config text box and enter the following command: auth-user-pass /tmp/auth.txt
- The “Server IP/Name” is the address of the VPN server location you wish to connect to. You can find your Server IP/Name and Port in the .ovpn config file you get from your VPN. To do so: Open the .ovpn file in any text editor. Copy the “remote” server cluster name listed in the config file, and paste it into the Server Address/Port field of the OpenVPN basic control panel. Do the same for the port.

- In the control panel for your DD-WRT router, click on the “Services” tab, followed by the “VPN” sub-tab.
- Locate the Additional Config and enter the config details. You will need to get these from your VPN.
For ExpressVPN they look like this:
- Look at the OpenVPN config (.ovpn) file that you got from your VPN provider earlier in a text editor. Copy-paste the text in between "tls-auth and /tls-auth" into the TLS Auth Key field. See the example image below to copy the right data:

- Look at the .ovpn file again in a text editor and copy the text in between "ca and /ca" and paste it into the CA Cert field. See sample image below:

- Copy the text in between "cert and /cert" and paste it into the Public Client Cert field. See the example image below to copy the right data:

- Copy the text in between "key and /key" and paste it into the Public Client Cert field. See the example image below to copy the right data:

- Click on Save, and then click Apply settings to start the connection to the VPN.
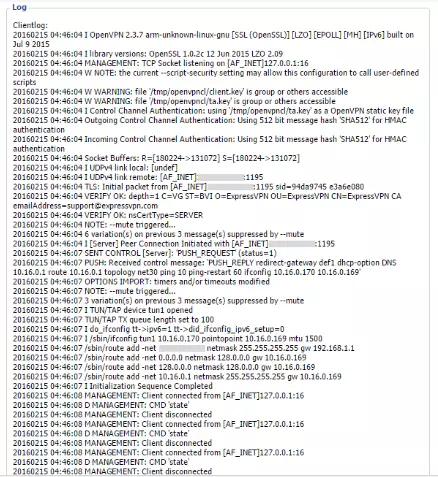
- To check on your connection status, Click on Status > OpenVPN. If you see blank forms, something has not been set up properly. You will probably need to follow the steps above again to make sure everything has been entered and saved correctly. Once entered correctly it should look like the screenshot below:


![ddwrt p2]()
- If you need help with any of the steps above, or if anything is unclear, please contact your VPN directly. They will have a VPN-specific guide like this one with all the data you need. Live chat support will also be happy to walk you through the process.


How to Test a VPN on your Router
DNS leaks tell your Internet Service Provider what websites you are visiting online: spoiling the privacy provided by the VPN. This is a huge problem, which is why you should always ensure that you are not getting any DNS leaks. To ensure that you are not getting DNS leaks on your router's VPN connection, follow the following steps.
- On the router dashboard, go to Setup > Basic Setup.

- Under Network Address Server Settings (DHCP), enter the following DNS settings (these are the setting for Google DNS - you may need to use different DNS setting so please check with your VPN): Static DNS 1: 8.8.8.8 - Static DNS 2: 8.8.4.4 - Forced DNS Redirection: tick this box

- At the bottom of the page, click Save and Apply Settings.

- At the top of the page, navigate to Services > Services.

- Under Additional DNSMasq Options, enter the following interface=tun1 (for ExpressVPN). However, you should ask your VPN for these settings or follow their specific guidelines.
- At the bottom of the page, click Save and Apply Settings.


DD-wRT VPN Setup Guide - Conclusion
Installing a VPN onto a DD-WRT router means that all the devices in your home are protected with a single VPN connection. This is an extremely efficient and secure way of setting up a VPN. Above we have explained the steps needed to install a VPN on a DD-WRT router. In the example we use ExpressVPN. However, any of the VPNs in our 5 best VPNs for DD-WRT routers will have a specific set up guide, so please contact your VPN for more precise guidelines on setting up your VPN.